Product Support
Attachments
Adding an Attachment to a Claim
Completing a Payer Request for Additional Details
Creating a Custom Attachment Rule
Creating a Stand Alone Attachment
Download the Attachment Tool
FAQs for AttachmentConnect
Locating the Attachment Payer List
Searching for a Claim with Attachments
Using Capture All Attachments
Statements
Claims
Add or Change Billing Information
Adding Users to DentalXChange
Change Practice Management System
Correcting a Validation Error
Download the Batch Upload Tool
FAQs for ClaimConnect
Frequestly Asked Questions for the DentalXChange Management Desktop
Medi-Cal Dental: Add Payer Claim ID from NOAs to Claims on Submission
Registering for DentalXChange
Resetting DentalXChange Password
Submitting a Claim Directly on DentalXChange
Uploading a Batch Claim File
Credentialing
Credentialing For Providers
Creating an Application
FAQ's for Providers using CredentialConnect
Adding Approvals From Payers
Creating a New Account with CredentialConnect
How to Edit Locked Application Fields
How to Update Expiring Supporting Documents
Introduction to CredentialConnect for Providers
Password Recovery
Payer Messages
Submitting an Application Via Email
Understanding the Homepage
Username Recovery
System Requirements for CredentialConnect
Uploading Files to CredentialConnect
Eligibility AI
Payer Portals- Credential Creation
Ameritas
Carefirst
Cigna
DNoA
Delta Dental State Portals- AK, AR, CO, CT, IL, KS, MA, NJ, OK, OR, RI, SD, VA, WA, Northeast, Delta Covers Me
Delta Dental State Portals- IA, ID, MO, SC, WI, WY
DentalHub- Adding a New Team Member
Geha
Guardian
MetLife- Updating MFA Email
Metlife
Principal
United Concordia
FAQ's for Eligibility AI
Introduction to Eligibility AI
Reviewing Eligibility & Benefit Details
Add Payer Credential with Multi-Factor Authentication
Common Reasons for Failed Benefit Checks
Managing Payer Credentials
Manually Running an Eligibility Check
Notes and Benefit Customization
Merchant Services
CardPointe Portal
How to setup Payment Plans
Notifications & Alerts
Reconcile Merchant Services (PayConnect) Transactions
Video: How to Process a Refund
Video: How to Process a Void
Video: How to Set Up Payment Plans
Video: How to Use Text-to-Pay
Video: How to use the Virtual Terminal
Real-Time Eligibility
Electronic Remittance Advice
Enrollment
Partner Support
- All Categories
- Product Support
- Eligibility AI
- Managing Payer Credentials
Managing Payer Credentials
One of the main features of Eligibility AI is the capability of connecting directly to the payer's portal. This is where it will grab the benefit information for your patients and organize and format the data for you in an easy to read and searchable format. To accomplish this, all you need to do is add the usernames and passwords you have for the various insurance company's website, and Eligibility AI takes it from there.
Adding a New Credential
Start by heading to the "Administration" section in Eligibility AI. Next, go to the "Payer Credentials" tab and click on the blue "New Payer Credential" button on the upper right hand corner.
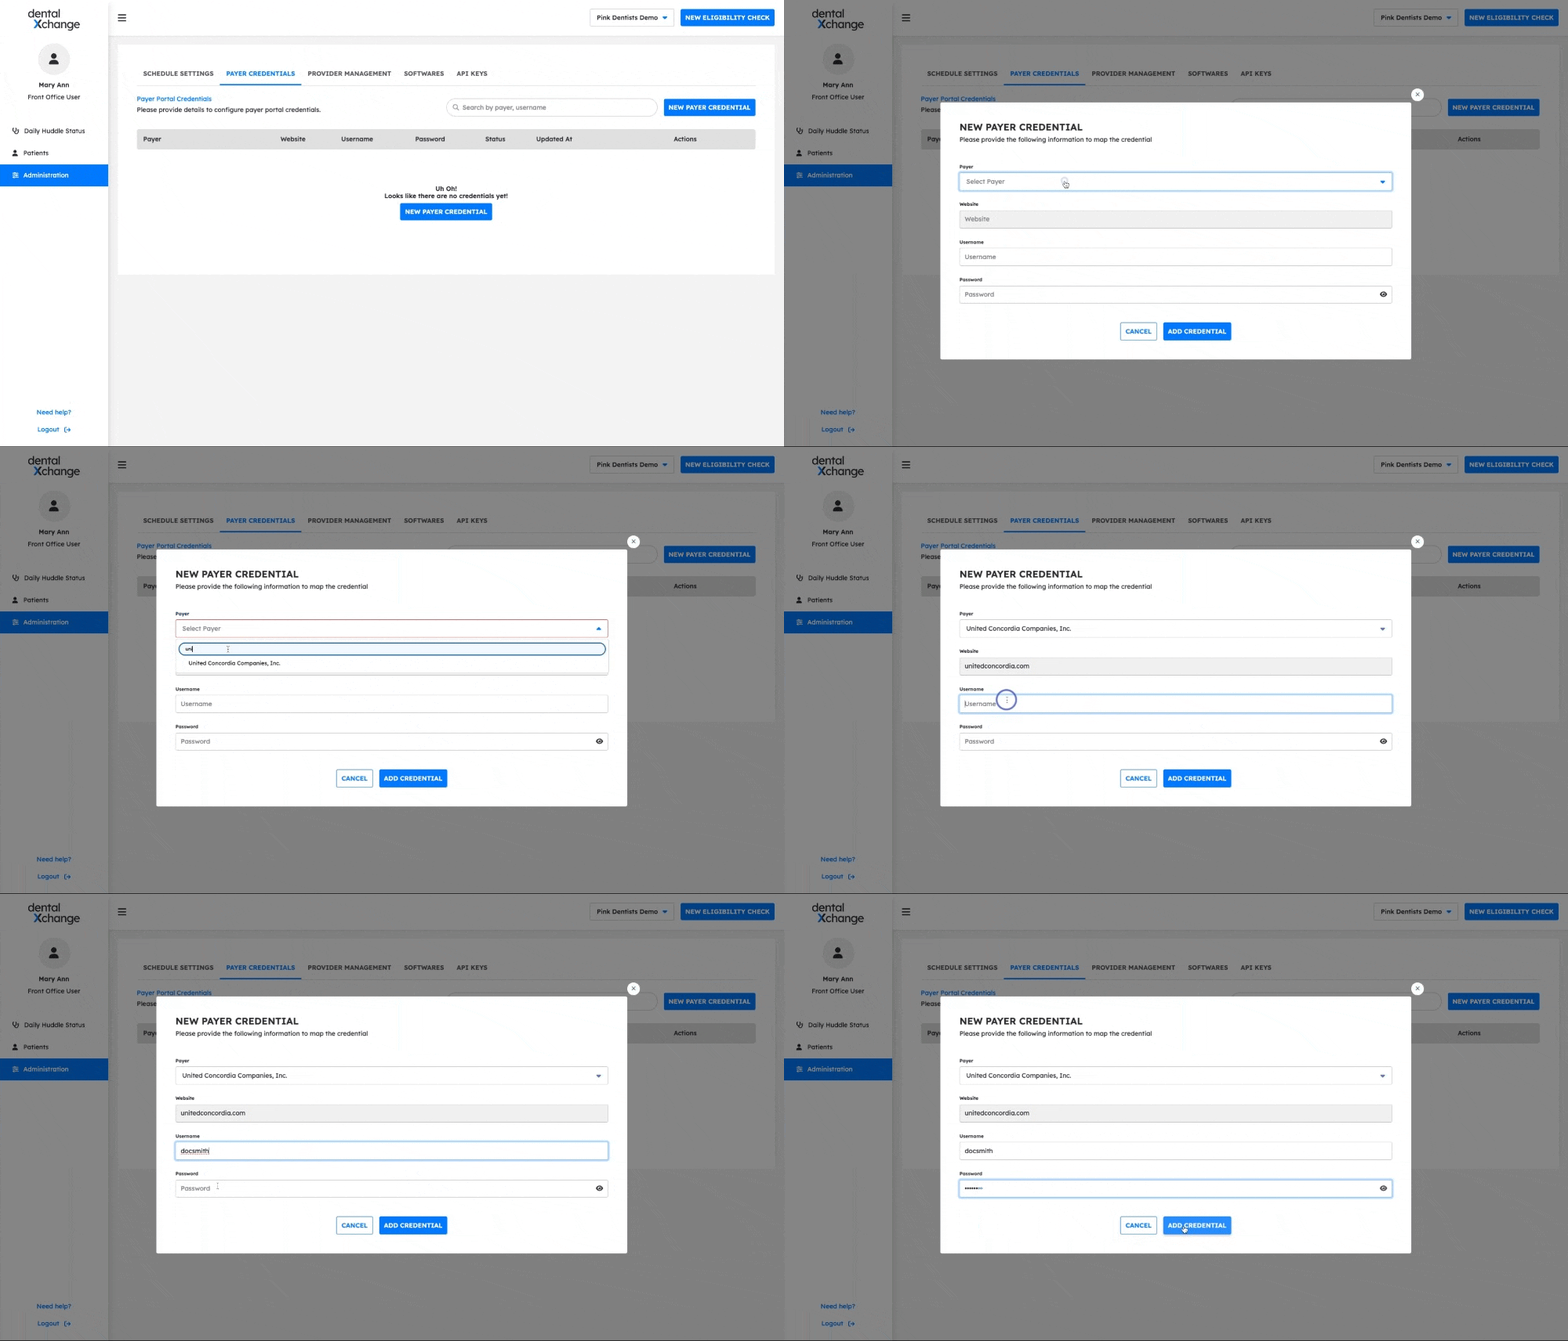
This will bring up the credential window. Here you will select the insurance company you are adding credentials for. The payer's website will automatically fill based on your selection. Ensure you are entering the credentials for the website address listed. Some payers have multiple websites they use for benefit checks. However, Eligibility AI is only able to complete checks using the site listed.
Next, simply add your username and password for that site. Finally click "Add Credential."
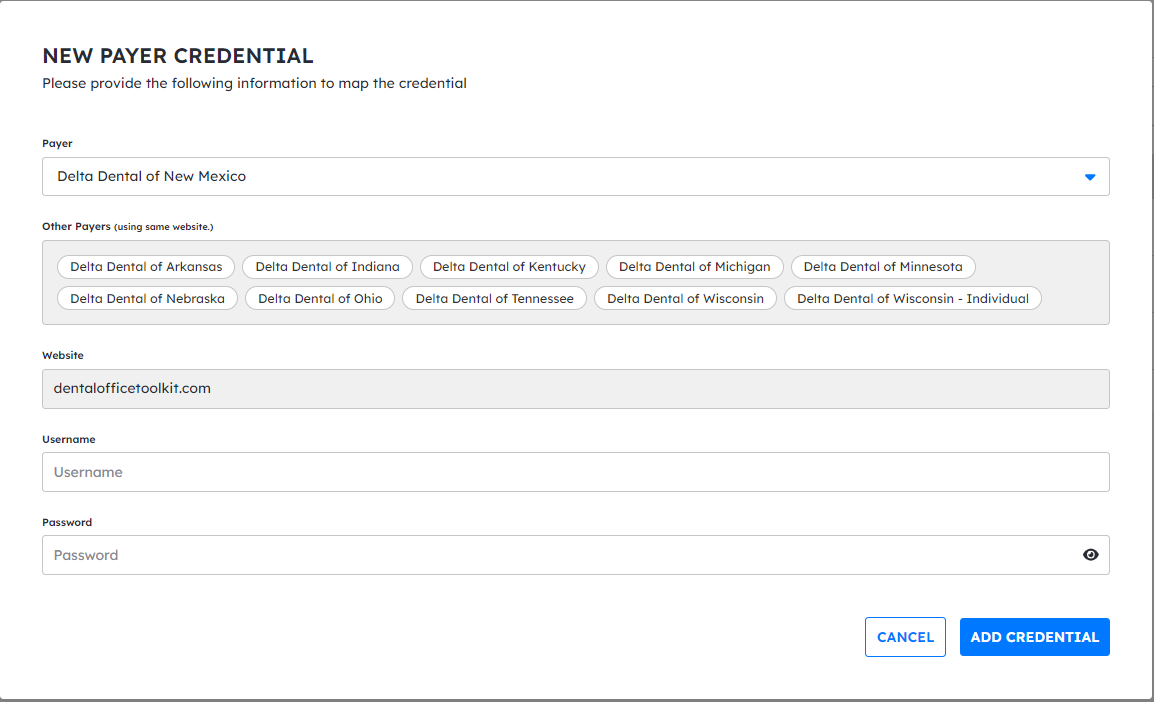
Some payers may require a "MFA" multi-factor authentication. Please check out our guide on how to add the MFA token during the credential process.
Editing or Deleting a Payer Credential
Sometimes you might need to edit your credentials or remove them outright, especially if the credentials are marked as "invalid". To do so, simply navigate to the "Payer Credentials" tab on the Administration section on Eligibility AI. You will see the following action buttons when you get to this tab.

- The "Eye" button will show the saved password for the payer's site.
- The "Double Page" button will act as a copy button and allow you to use those same credentials for a different payer's site.
- The "Pad and Pencil" button will let you edit the saved username and password for a payer's site.
- The "Trashcan" Button will delete the saved credentials for a payer's site.
1. The password entered for the payer's site has expired.
2. The password was entered incorrectly on the Payer Credentials tab.
3. The wrong website/payer was selected when entering the credentials.